
Tint Bubbles After Install: Wait 1 to 4 Weeks, or Call Now
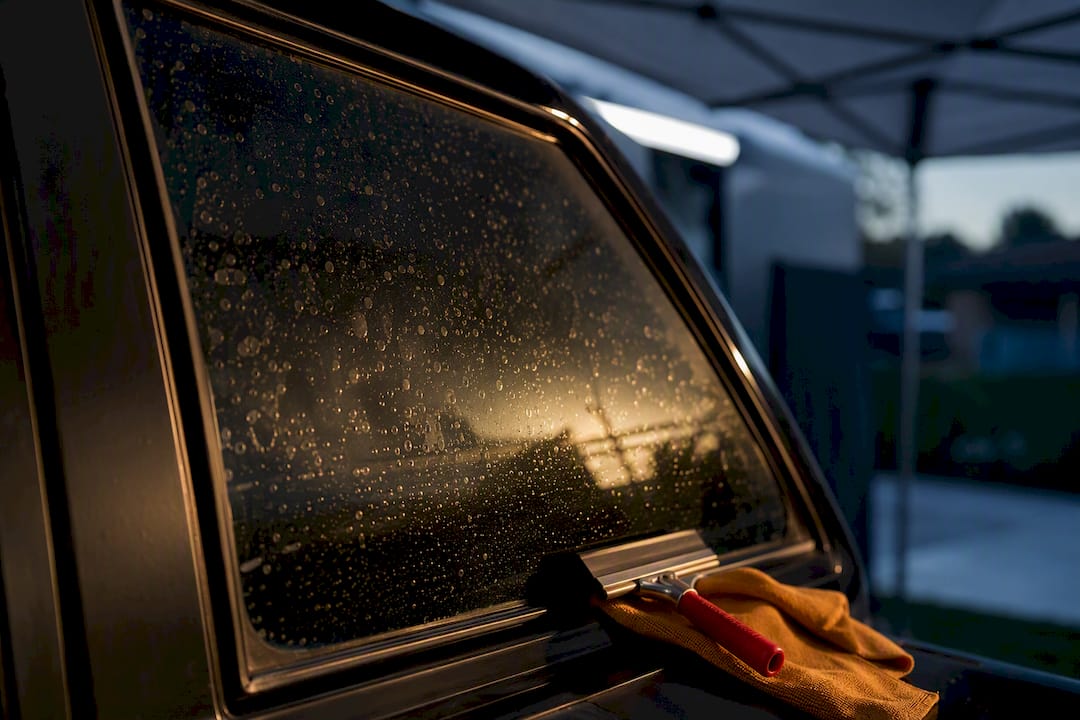
Small, hazy bubbles that show up right after tint installation are usually just moisture working its way out, and they typically clear on their own within 1 to 4 weeks. Distinct, well-defined air pockets that don’t shrink, or bubbles that keep growing, point to an installation issue that needs a professional look. Either way, don’t roll the windows, don’t clean the glass, and snap a few dated photos so you have a record if you need to call your installer.
TL;DR:
Moisture bubbles typically shrink and clear within three to four weeks, especially with warm weather accelerating the evaporation process.
Persistent, well-defined air bubbles that do not diminish after two weeks likely indicate an installation issue requiring professional inspection.
Avoid touching, cleaning, or puncturing bubbles during the first week and never use ammonia-based cleaners or heat guns that can damage the film.
Bubbles larger than a few centimeters or that grow over time should prompt you to contact your installer within four weeks.
Mobile repair services can evaluate and fix stubborn bubbles after several weeks, provided you have photos and installation details ready.
Table of Contents
Moisture Bubbles Vs. Air Bubbles: What You’re Actually Looking At
Not every bump under your tint means something went wrong. The trick is learning to read what you see, because moisture bubbles and air bubbles behave in almost opposite ways.
Moisture bubbles come from the water-based slip solution installers use to position the film on the glass. They look hazy, cloudy, or milky, and they’re usually small and scattered rather than concentrated in one spot. Give them a few days and you’ll notice them shrinking, sometimes visibly overnight in warm weather.
Air bubbles tell a different story. These have sharp, well-defined edges, tend to be bigger, and often sit near a corner or edge where the installer had to work around a curve. Trapped dust, a contaminant on the glass, or an adhesion failure usually causes them, and they won’t shrink on their own because there’s no moisture inside to evaporate.
A few other things worth watching for in the first week:
A tiny white speck under the film that never moves is likely dust or a small glass flaw, not a bubble at all.
Finger-shaped or streaky lines usually mean a wrinkle, not trapped air, and it’s a separate issue from bubbling.
Bubbles that appear weeks later, especially in hot weather, can signal heat stress on the adhesive rather than a fresh install problem.
Check your windows daily for the first week and note whether each spot is shrinking, holding steady, or spreading. That single observation tells you almost everything about which category you’re dealing with.
How Long Do Tint Bubbles Take To Go Away?
Expect the first two or three days to look the roughest. The film hasn’t fully bonded yet, and the glass often looks cloudy all over, not just in isolated spots. By the end of week one, moisture bubbles should be visibly smaller, and by after a few weeks, most windows look clear and smooth during the typical curing period.
Weather changes that timeline more than people expect. Heat and sunlight speed up evaporation, so a car parked outside in Phoenix summer might clear up closer to the 3 to 7 day range mentioned by installers in warmer climates. Cold or humid conditions slow that same process down, sometimes pushing the full cure closer to four to six weeks. The film itself doesn’t dry the way paint does. Moisture has to migrate through microscopic channels in the adhesive layer and escape at the edges, which is a slower process than most people picture when they hear the word “curing.”
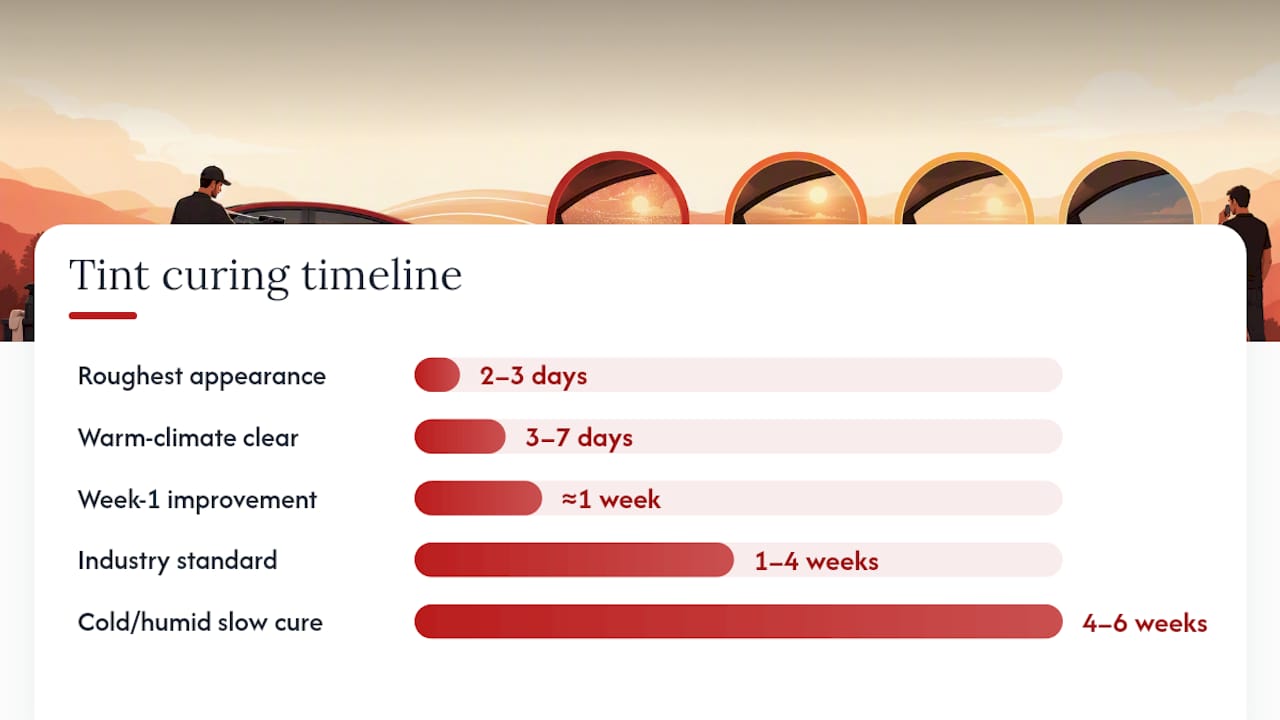
The 1 to 4 week window is the industry standard for a reason. Most reputable tint shop guides converge on this range as the point where moisture bubbles should be gone or nearly invisible, assuming normal weather and no direct interference with the film during that stretch.
Use these thresholds to decide whether you’re still in normal territory or not:
Small bubbles noticeably shrinking week over week: keep waiting, this is normal curing.
Large, sharp-edged bubbles unchanged after 2 weeks: time to call your installer.
Any bubble that’s visibly bigger than it was a few days ago, at any point: don’t wait, get it looked at.
Bubbles appearing alongside peeling edges or color shift: treat as urgent, not routine.
What To Do (And Avoid) In The First Few Days
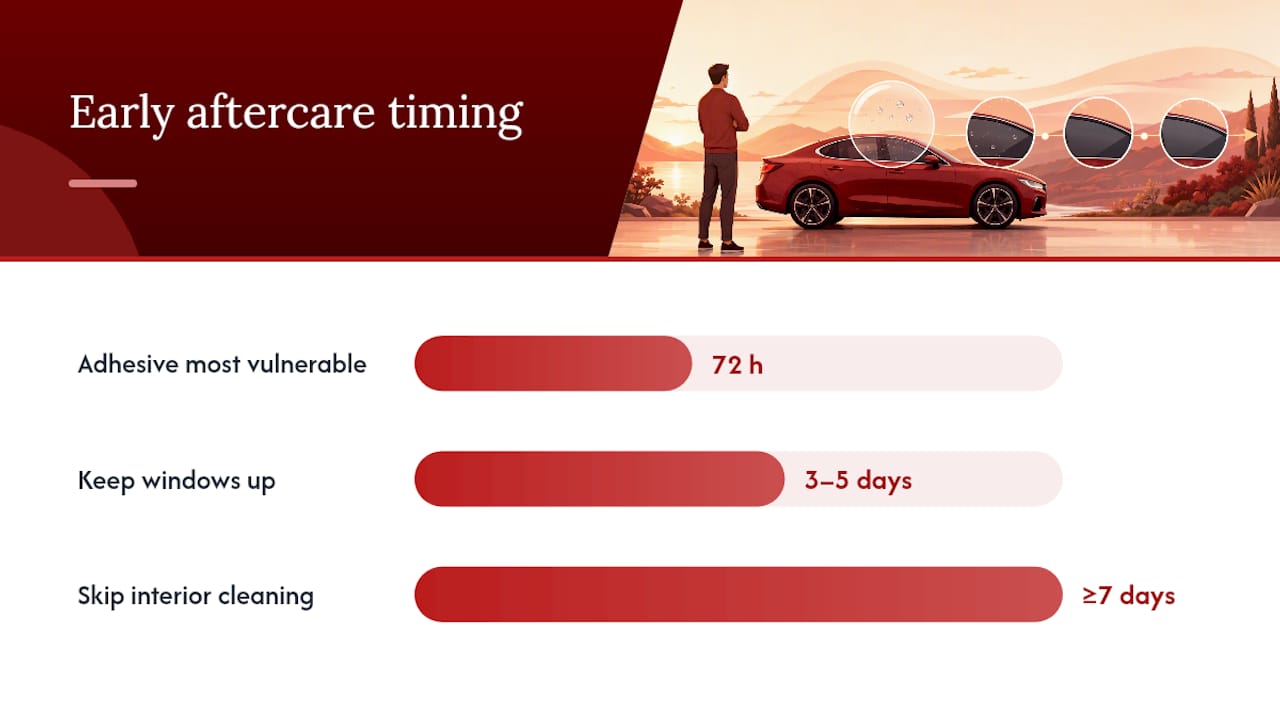
The choices you make in the first 72 hours matter more than almost anything after that, because the film is at its most vulnerable while the adhesive is still setting.
Leave the windows up and avoid touching the film for three to five days. Rolling the glass down too soon can shift film that hasn’t fully bonded yet.
Skip cleaning the interior glass for at least a week. Even a soft cloth can drag on soft, uncured film and leave permanent marks.
Park in direct sunlight when you can, especially in the first week. Heat speeds up moisture evaporation and helps the film settle faster.
Follow whatever written aftercare sheet your installer gave you. Reputable shops build their instructions around the specific film and adhesive they used, and that sheet outranks generic internet advice.
A few things to actively avoid: never pop, prick, or pierce a bubble no matter how tempting it looks, because that creates a permanent hole in the film rather than releasing the trapped air. Skip ammonia-based glass cleaners entirely. Ammonia breaks down the film’s adhesive and dye layer over time, and it’s one of the most common causes of tint failure that has nothing to do with the original install. Stay away from sharp tools or heat guns too. High heat can delaminate film that isn’t fully cured yet.
Pro Tip: If you want to gently help a small moisture bubble along, sunlight does more work than any tool you could use. A soft, clean squeegee applied with light pressure from the center outward can help, but only on bubbles that are already soft and shrinking, never on sharp, defined air pockets.
For readers curious about what separates a quality install from a rushed one, Phenomenalautocare’s ceramic window tint page covers the materials and prep work that reduce bubble risk in the first place, and the piece on how nano ceramic tint protects your windows explains why film quality affects how forgiving the curing process is.
When It’s Time To Call Your Installer
Waiting is the right move for the first couple of weeks, but certain signs mean you should stop waiting and pick up the phone.
Large, stable bubbles that haven’t changed size after 2 to 4 weeks.
Any bubble that’s clearly bigger than it was days or weeks earlier.
Edges of the film lifting, curling, or peeling away from the glass.
Purple or reddish discoloration, which usually signals dye breakdown rather than a bubble issue.
Persistent creasing or a haze that never fully clears.
When you do reach out, bring dated photos showing how the bubble has changed over time, your original receipt or warranty paperwork, and a quick note on the conditions during install, since temperature and humidity that day can explain a lot.
What happens next depends on the cause. Shops typically lift the affected section, clean the glass underneath, and reapply fresh film, or replace the panel outright if the contamination is widespread. A legitimate installer backing their work under warranty should handle a true installation defect at no cost, though the appointment itself usually takes less time than the original install since it’s typically one panel, not the whole vehicle.
Safe DIY Fixes And When To Leave It Alone
A small, soft moisture bubble in the first week is fair game for gentle intervention. Anything else isn’t worth the risk.
Safe: a soft, clean squeegee pushed gently from the center of the bubble outward, paired with a few hours of direct sunlight to speed evaporation.
Safe: photographing the same spot every few days to track whether it’s actually shrinking.
Risky: puncturing the film, using a heat gun on high, or scrubbing with ammonia-based cleaner. All three commonly cause delamination or adhesive failure that a professional then has to fix anyway.
If the bubble is soft, shrinking, and less than a week old, DIY patience is the right call. If it’s sharp, defined, or getting bigger, stop touching it and get a professional opinion instead.
How We Look At Bubbling Complaints
Mobile tint work means we see this exact question constantly, usually from a customer who installed film days earlier and is staring at a windshield wondering if they made a mistake. Phenomenalautocare has built its reputation, including a 5-star rating from over 250 customers across Arizona and several community service awards, on treating that kind of concern seriously instead of brushing it off.
A real inspection starts by identifying the bubble type, testing adhesion at the edges, and checking whether the issue is isolated or spread across the panel. From there, we walk the customer through realistic next steps, whether that’s more patience or a scheduled repair.
Photos and case examples from past tint repairs to be added here.
— Phenomenal
Get A Professional Look At Persistent Tint Bubbles
If your bubbles are past the two to four week mark and still stubbornly sitting there, Mobile inspection and repair services can come to you instead of requiring another shop visit and taking more of your time.

Bring your dated photos, your original installer receipt, and a quick note on how the bubble has behaved since day one. That’s all we need to diagnose whether the fix is a simple reapply or something more involved. Technicians handle window tint work as part of a broader mobile detailing lineup, so if your vehicle needs more than just a tint fix during the visit, that can be accommodated. Ready to stop guessing and get an answer? Book a mobile detailing appointment in Mesa and we’ll take a real look at what’s going on under that film.
Sources
For technical detail on why bubbles form during installation, the Madico guide to common tint issues is the stronger read. For troubleshooting a bubble you’re already looking at, Gilroy Blackout’s breakdown and the normal versus problem bubble guide from Solar Solutions both walk through real-world identification in plain terms.
Recommended
Comments