
Car Owners: 8–10 Hour Dry Time for Safe Seat Belt Cleaning
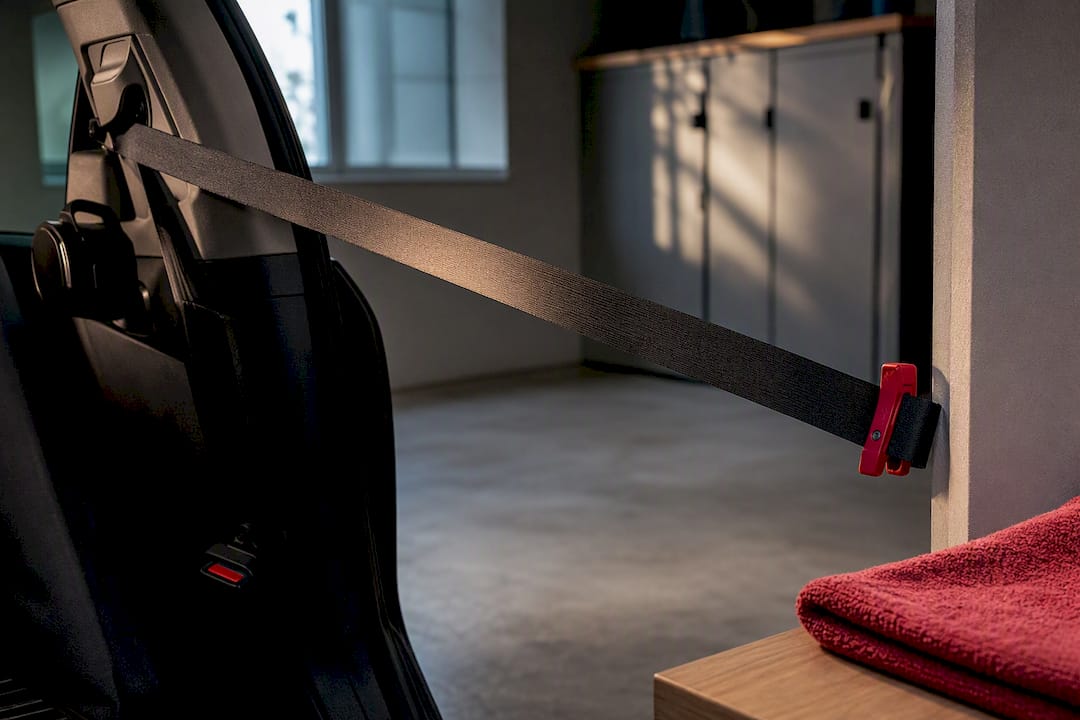
The safest seat belt cleaning method uses a mild, pH-neutral soap on a damp cloth, never a direct spray, with the belt pulled to full extension and clamped so no moisture reaches the retractor. Clean along the webbing in short passes, rinse with a fresh damp cloth, and skip anything harsh. Never let the belt retract until it’s completely dry, inside and out.
TL;DR:
Using a pH-neutral cleaner and misting it onto a damp cloth ensures safe cleaning without risking fiber damage or oversaturation.
Extending the belt fully and clamping it prevents moisture from reaching the retractor, which is critical for proper drying and mold prevention.
Repeated rinsing with a clean cloth and patience during air-drying minimizes residue buildup and reduces the risk of mold and retractor issues.
Addressing specific stains requires tailored treatments, such as baking soda for odors or hydrogen peroxide for blood, and should be followed by thorough rinsing.
Professional cleaning is recommended for persistent mold, odors, or sluggish retraction, as specialized equipment ensures complete sanitation and drying.
Table of Contents
What You Need for Seat Belt Cleaning
Reach for a pH-neutral cleaner before anything else. Regular dish soap diluted in warm water works for most grime, and it won’t strip the dyes or coatings baked into the webbing fibers the way harsher formulas can. A dedicated upholstery cleaner rated safe for seat belts is fine too, but check the label for bleach or solvents first.
Beyond the cleaner, you’re working with a short list of tools:
Two or three clean microfiber towels (one for cleaning, one for rinsing, one for drying)
A soft-bristle brush, the kind sold for interior detailing, not a scrub brush
A plastic clamp or heavy binder clip to hold the belt extended
A small spray bottle for controlled misting
A bucket for diluting your cleaner
Test peroxide on a hidden section of webbing first. It can lighten color if left too long.
How Do You Prep the Belt Before Cleaning?
Pull the belt out to its full length and hold it there. This single step matters more than any cleaner you choose, because it keeps the wet section of webbing away from the retractor spool, where moisture has nowhere to go and no way to dry.
Extend the belt completely and clip a plastic clamp at the point where it enters the pillar, so it can’t retract while you work.
Lay a towel across the seat and door sill beneath the belt to catch drips before they soak into fabric or carpet.
Position yourself so you’re working with gravity, cleaning downward along the belt rather than fighting an awkward angle.
Never force the belt past its natural stopping point. Modern retractors lock under sudden tension, and cranking on a jammed belt can trip that mechanism.
Skip metal clamps or clothespins with metal springs. They can nick the webbing or leave rust marks that are harder to fix than the stain you started with.
What Is the Safest Seat Belt Cleaning Method?
With the belt clamped and extended, the actual cleaning is straightforward, but the order of operations protects both the fabric and the mechanism.
Apply the cleaner to a cloth, not the belt. Mist your microfiber towel lightly, or dip and wring it out, so you’re transferring cleaner rather than saturating the webbing.
Work in short passes along the direction of the weave. Wipe top to bottom in overlapping strokes rather than scrubbing in circles, which can fray the fiber bundles over time.
Agitate set-in stains gently with the soft-bristle brush. For fresh spills, skip the brush and blot immediately instead. Blotting lifts liquid before it sets; scrubbing a fresh stain just pushes it deeper into the fibers.
Rinse with a second, clean damp cloth. Pass it over the same section a few times to lift cleaner residue. Leftover soap attracts dirt faster than the original stain did.
Repeat the apply-and-rinse cycle until the webbing feels clean, not tacky. If it still feels sticky after two passes, you’re leaving soap behind, not dirt.
Do a final wipe with a dry towel, keep the clamp in place, and walk away. The belt needs uninterrupted air-drying time before it goes back into service.
Pro Tip: Keep a second clamp in your kit for four-door vehicles with rear belts. Cleaning both front and back seats in one session means you can let everything dry overnight instead of babysitting one belt at a time.
Detailing professionals who mist cleaner onto a cloth rather than spraying it directly onto the belt report better control and less risk of oversaturation, which matters most when the buckle housing and retractor sit just inches away from your cleaning zone.
How Do You Remove Specific Stains and Odors From Seat Belts?
Different stains call for different tactics, and treating them all the same way is how people end up with a bleached spot or a belt that still smells musty a week later.
Mold and mildew: Wipe the visible growth away with your soap solution first, then follow with a light antimicrobial mist made for fabric. If mold has spread across a wide section or keeps returning, that’s a job for a professional, not another round of DIY spraying.
Odors: Sprinkle baking soda over the damp belt during the drying phase and let it sit for a few hours before brushing it off. A diluted vinegar mist or a fabric-safe odor neutralizer works too, applied lightly rather than soaked in.
Grease and oil: A stronger dish soap spot treatment breaks down oily residue, but rinse thoroughly afterward. Leftover soap film on an oily stain just traps more grime.
Blood: Blot with cold water only. Hot water sets blood protein into the fibers permanently. If the stain persists, test hydrogen peroxide on a hidden section of webbing near the buckle before applying it to the visible stain.
Sunscreen and body oils: These need patience more than power. Several mild soap passes with thorough rinsing between each one will lift the residue without needing a stronger chemical.
Why Does Complete Drying Matter So Much?
The retractor spool sits behind the pillar trim, coiled tight with fabric that has almost no airflow. Any moisture trapped in that coil has nowhere to evaporate, which makes it one of the more common places for mold to take hold and for metal components inside the mechanism to start corroding.
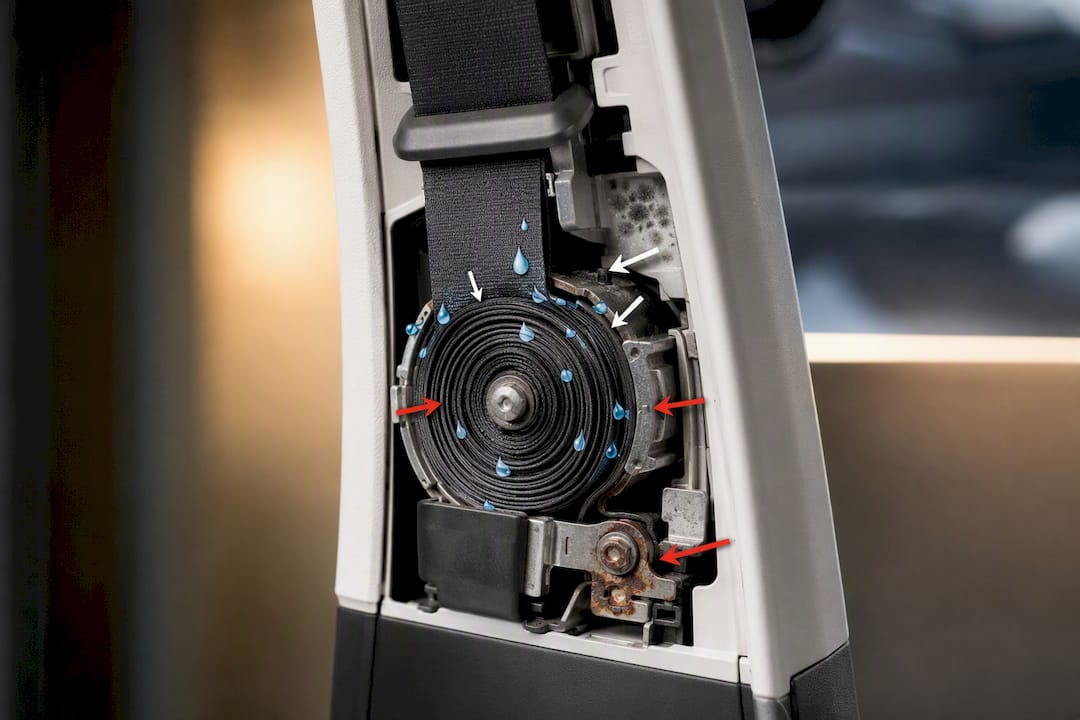
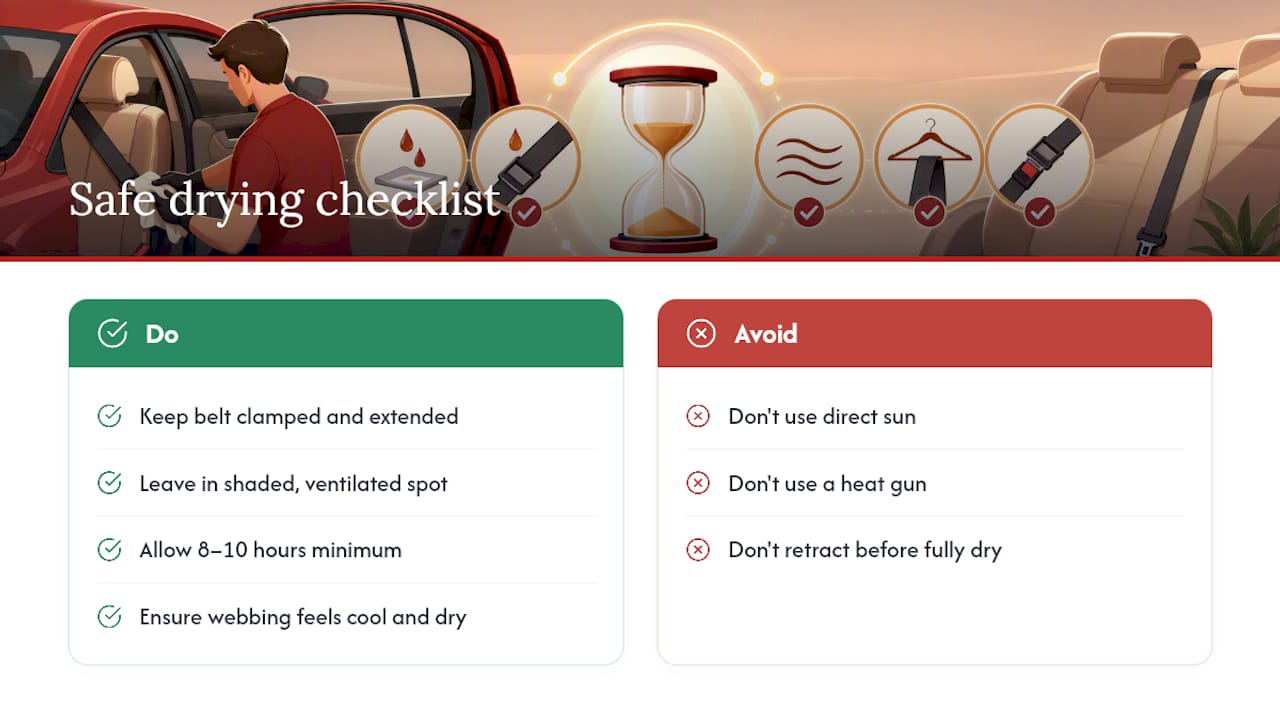
Detailers point to impatience with drying as the most common cause of later mold or retractor problems, more so than any cleaner choice. Leave the belt clamped and extended in a shaded, well-ventilated spot. Skip direct sun or a heat gun. Practical drying checklists recommend 8 to 10 hours minimum before you even think about retracting it. Check by touch: the webbing should feel cool and completely dry, not just dry to a quick pass of your fingers.
What Should You Never Use to Clean a Seat Belt?
A short list of products and methods will do more damage than the stain ever did:
Bleach, solvents, alcohol-based cleaners, and fabric dyes weaken the webbing fibers and can compromise how the belt performs under load.
Machine washing, tumble drying, and high-pressure or high-heat steam cleaning can distort the weave or force water directly into the retractor housing.
Metal clamps, sharp scraping tools, and retracting the belt before it’s fully dry are the three mistakes detailers see most often.
Manufacturer guidance backs this up directly. Ford’s owner manual explicitly warns against bleach, solvents, and dye on seatbelts, calling instead for mild soap, water, and air-drying. That’s not a suggestion specific to one brand. It’s the standard warning across nearly every manufacturer manual on the market.
How Do You Check a Seat Belt Is Safe After Cleaning?
Once the belt is fully dry, run through a quick inspection before anyone relies on it again.
Look closely along the entire length for fraying, thinning, or a fuzzy texture where fibers have started to separate. Any of these mean the belt needs professional evaluation, not more cleaning.
Test retraction. A clean, healthy belt should pull back into the pillar smoothly and completely, with no hesitation partway through.
Test the lock. Give the belt a quick, firm tug. It should lock instantly. If it feels sluggish or takes a second try, that anchor may still have residue in the mechanism, or it may need a technician’s attention.
Book a professional inspection if either test feels off. Honda’s own service documentation notes that dirt buildup near the anchor point can slow retraction, which is exactly the symptom a quick post-cleaning check is designed to catch.
When Does Seat Belt Cleaning Need a Professional Detailer?
Mold that keeps coming back, biological stains that need more than surface treatment, or a retractor that feels sluggish after cleaning are all signals a DIY pass isn’t enough. That’s the line where controlled steam extraction, proper odor treatments like a Bio Bomb application, and hands-on retractor inspection start to matter more than another bottle of spray cleaner from the shelf.
Interior detailing at this level uses equipment most garages don’t have: steam units that manage moisture output precisely, so you get sanitizing heat without soaking the retractor spool. Phenomenalautocare handles this as part of its interior detail packages, and because the service comes to your driveway across the Phoenix area, you’re not stuck driving around with a belt you’re not sure is safe yet.
The Detailer’s Take on Seat Belt Cleaning
Most seat belt cleaning advice online focuses entirely on stain removal and treats drying as an afterthought, a quick “let it air dry” line tacked onto the end. That’s backwards. The chemistry of getting a stain out is the easy part. Almost any mild soap handles that. The part people get wrong, over and over, is rushing the dry cycle because they want their car back to normal by the end of the afternoon.
If there’s one thing worth prioritizing above every other step in this guide, it’s patience with drying time, not the cleaner you buy or the brush you use. A belt cleaned with the wrong soap but dried properly poses far less risk than a belt cleaned perfectly and retracted wet. Trapped moisture doesn’t announce itself. It sits quietly in the retractor for weeks before you notice a musty smell or a sluggish pull, by which point you’re looking at a repair instead of a cleaning job.
Treat the clamp and the wait as the actual safety step. Everything else is just soap.
— Phenomenal
When Should You Call Phenomenal Auto Care Instead?
If you’re staring at mold that won’t quit, a lingering odor no amount of baking soda has touched, or a belt that just doesn’t retract the way it used to, that’s your signal to stop reaching for another spray bottle. Such issues may require professional interior detail packages that go beyond a surface wipe.

Our Complete Detail service handles moderate interior buildup with steam extraction that lifts grime without oversaturating fabric or webbing, and for vehicles with heavier contamination, from pet accidents to persistent mold, our Full Detail package pairs deep interior work with odor treatments strong enough to solve the problem instead of masking it. If your seat belt retraction feels sluggish after any cleaning attempt, that’s worth a technician’s eyes before you drive on it. Mobile service means we come to you across the Phoenix area, so book a service appointment and get it looked at properly instead of guessing.
Sources
Owner’s manuals from Ford and Honda warn against bleach and solvents on seatbelts. Federal FMVSS seat belt standards set the regulatory baseline, while practical guides from Engineerskill and a back seat organizer can help prevent future stains altogether.
FAQ
What Kills Mold on Seat Belts?
A pH-neutral soap solution removes surface mold, followed by a light antimicrobial fabric mist to address what’s left behind. Heavy or recurring mold growth usually means moisture has reached the retractor, which calls for a professional inspection rather than repeated home treatments.
How Do I Get Rid of a Smelly Car Seat Belt?
Baking soda applied during the drying phase absorbs most odors within a few hours, and a diluted vinegar mist handles what baking soda misses. For odors that keep returning, the smell is often trapped moisture rather than surface dirt, which is exactly what a Bio Bomb odor treatment is built to resolve.
What Is a Good Spray for Cleaning Car Seat Belts?
A mild dish soap diluted in water works as well as most dedicated products, applied to a cloth rather than sprayed directly onto the webbing. Avoid anything labeled with bleach, solvents, or dye, since manufacturer manuals consistently warn against all three for seatbelt fabric.
Can I Steam Clean Seat Belts?
Steam can work, but only with tightly controlled moisture output and the belt fully clamped away from the retractor, which is why this is usually better left to professional equipment. High-heat or high-pressure steam at home risks pushing water into the retractor housing, the exact problem the clamp-and-dry method is designed to prevent.
How Long Should a Seat Belt Air-Dry Before Use?
Plan on a minimum of 8 to 10 hours with the belt clamped and extended in a shaded, ventilated spot. Check by touch before retracting. The webbing should feel completely cool and dry, not just dry on the surface.
Recommended
Comments